Config Lab: Stateful DHCPv6
IPv6 supports several methods for clients to build their IPv6 addresses and learn other related settings, such as stateful DHCPv6, SLAAC with stateless DHCPv6, and SLAAC with RDNSS. These methods require different kinds of configuration on the router connected to the client subnet. In this Config Lab, you choose, configure, and verify the settings to support stateful DHCPv6 clients. Note that this lab requires only a small amount of config, but has a lot of opportunities to learn with show commands and exploration. Enjoy!!

The Lab Exercise
Requirements
First, you need to use Cisco Modeling Labs (CML) for this lab. You can use CML-Personal Edition or CML-Free. If this is the first time you’ve seriously thought about using CML, it may be a good time to try it out with the free version. If so, you might want to check out my video series on CML-Free.
Why no Cisco Packet Tracer (CPT) file? Because CPT doesn’t support DHCPv6 relay, which is required by the lab.
The core of this lab requires you to figure out WHERE to configure DHCPv6 Relay and WHERE to configure various IPv6 flags that affect client address discovery. Then you decide WHAT to configure in those locations. However, the total number of configuration commands for this lab is small – it’s more about choosing which settings to use among several, and where to configure them.
This lab also has a great opportunity to learn and experiment with these features using EXEC commands. You can, and should, follow a sequence like this:
- Before configuring the lab, verify the initial state, confirming what is MISSING from the PC (PC1).
- Configure per the lab instructions.
- Trigger the PC to try again to lease/learn/build its IPv6 address and learn other settings. (You will do a shutdown, wait 5 seconds, and then a no shutdown on the E0/0 interface.)
- Repeat step 1’s commands, confirming what has changed, and that the PC has a GUA and has learned other settings, like the DNS server address.
The PC in this lab is actually a router configured to act like a PC. When testing this lab, I first tried Linux nodes for the PC, but they did not work well. (It appears that the Linux builds with CML do not include a DHCPv6 client.) A Cisco router can lease an IPv6 address as a DHCP client, so I configured the supplied CML lab file to use a router as a PC. The PC/router does not act as an IPv6 router, but as an IPv6 host, so it uses DHCPv6 to lease an address and learn some other IPv6 settings.
The following table lists the IPv6 addresses in the lab; the figure that follows shows the topology.
| Device | Interface | IPv6 Address |
| DHCP Server |
Ethernet0/0 |
3fff:0:1:1::8 |
| R1 | Ethernet0/0 | 3fff:0:1:1::1 |
| R1 | Ethernet1/0 | 3fff:0:1:12::1 |
| R2 | Ethernet1/0 | 3fff:0:1:12::2 |
| R2 | Ethernet0/0 | 3fff:0:1:2::2 |
| PC1 | Ethernet0/0 | TBD |
Table 1 – IPv6 Address Quick Reference

Figure 1: Lab Topology
Initial Configuration
The examples below show the beginning configuration state of R1, R2, the DHCPv6 server, and the PC (a router).
hostname R1
!
ipv6 unicast-routing
!
interface Ethernet0/0
  ipv6 address 3FFF:0:1:1::1/64
  ipv6 ospf 1 area 0
!
interface Ethernet1/0
  ipv6 address 3FFF:0:1:12::1/64
  ipv6 ospf 1 area 0
!
ipv6 router ospf 1
  router-id 1.1.1.1
Example 1: R1 Config
hostname R2
!
ipv6 unicast-routing
!
interface Ethernet0/0
  ipv6 address 3FFF:0:1:2::2/64
  ipv6 ospf 1 area 0
!
interface Ethernet1/0
  ipv6 address 3FFF:0:1:12::2/64
  ipv6 ospf 1 area 0
!
ipv6 router ospf 1
  router-id 2.2.2.2
Example 2: R2 Config
hostname DHCPv6
!
ipv6 unicast-routing
!
ipv6 dhcp pool ccna_stateful
  address prefix 3FFF:0:1:2::/64
  dns-server 3FFF:0:1:1::8
  domain-name example.com
!
interface Ethernet0/0
  ipv6 address 3fff:0:1:1::8/64
  ipv6 dhcp server ccna_stateful
!
ip host www.example.com 3FFF:0:1:1::8
ip dns server
Example 3: DHCPv6 Server / DNS Server Config
hostname PC1
!
no ipv6 unicast-routing
!
interface Ethernet0/0
  ipv6 address dhcp
  ipv6 enable
Example 4: PC1 (IOS XE Router) Config
Re-Attempting DHCP Lease from Client PC
At the beginning of this lab, the PC will not work until you add some configuration somewhere in the network. But after you add the configuration, you must also get the PC (a router acting as a PC) to try to lease an address again. So, after any configuration change that might affect DHCPv6, use these steps on the PC, for its E0/0 interface:
- shutdown – Issue this command under interface E0/0.
- Wait 5 seconds – or until you see a log message that the interface is now down.
- no shutdown – Issue this command under interface E0/0.
- Exit config mode.
- Watch for related log messages. When the PC leases its IPv6 address, you typically see a message or two about the process working.
Verification Steps
Consider using these verification steps, both before and after adding your configuration. These commands will help reveal how the client PC did not work initially and then how it does work completely after you configure it correctly.
On the DHCPv6 Server:
- show ipv6 dhcp binding – empty output means no device has leased an address yet.
- show ipv6 dhcp pool – lists a counter of how many addresses have been leased; should show 0 (before adding config) and 1 (after successful config).
- ping 3fff:0:1:2::2 – This is a ping to R2’s E0/10interface address. It should succeed, which confirms routing from the server’s subnet to the client’s subnet.
On the DHCPv6 Relay Agent Router / Router with Addressing Flags (R1 or R2):
- show ipv6 interface – Look for the interface where you configured settings. Scan to the last output lines, which state facts about client address assignment flags.
- show ipv6 route – You should see three routes, for subnets 1, 2, and 12 (per the 4th quartet).
- ping 3fff:0:1:1::8 – A working ping proves this router can send packets to the DHCPv6 server.
- show running-config – Look for subcommands under the interface where you plan to add your configuration. Initially, there should be no configuration for a DHCP Relay Agent or for any address-related flags.
On PC1 (a Router):
- show ipv6 interface – Look for the GUA, which should be leased from the DHCPv6 server in this case.
- show ipv6 route – Does it have a default route (to ::/0?) What are the code letters and the description per the legend?
- ping 3fff:0:1:1::8 – Can the PC send packets to the server and back?
- ping www.example.com – The PC does NOT have any hostname information configured; it instead relies on DHCPv6 to learn the DNS server IP address. This ping command can only work if the PC has learned the IPv6 address of the DNS server. If the PC resolves the name to the correct address, this confirms it learned the DNS server address. (Note that www.example.com resolves to 3fff:0:1:1::8.)
- show ipv6 dhcp interface – Displays info learned by the PC (router) from the DHCPv6 server, like the DNS server IPv6 address and domain name.
- show ip dns server – Displays the address of the DNS server. (Erratic results during testing.)
Config Lab Intro Video
The above lab intro – the text, figures, and initial configuration – tells you all you need to know. But if you want a little more, with a little different slant on what to do in this lab, watch this lab intro video!
Answer Options - Click Tabs to Reveal
You can learn a lot and strengthen real learning of the topics by creating the configuration – even without a router or switch CLI. In fact, these labs were originally built to be used solely as a paper exercise!
To answer, just think about the lab. Refer to your primary learning material for CCNA, your notes, and create the configuration on paper or in a text editor. Then check your answer versus the answer post, which is linked at the bottom of the lab, just above the comments section.
This one’s a rare case, but: Do not do this one in Cisco Packet Tracer (CPT). The lab requires a DHCPv6 Relay Agent, and CPT doesn’t support the command.
This Lab Supports Both CML-Free and CML-Personal!!!
The downloadable file listed here works in both CML-P or CML-F because it uses the IOL (router) and IOL-L2 (switch) reference platform images supported by both products as of CML V2.8. Note that these images also require less CPU and RAM than the other CML-P options.
- Download the CML file (filetype .yaml) linked below.
- Import the lab’s CML file into CML.
- Start the lab in CML.
- Add your planned configuration to the lab.
- Test the configuration using some of the suggestions below.
Interface ID Differences:
Many of the labs here at Certskills that happen to support CML are built for Cisco Packet Tracer (CPT). CPT uses different interface ID numbering than CML, so for those labs, you have to mentally translate the lab instructions. Not so for this lab! The interface IDs in the lab details should match those in the CML file. Just letting you know that there’s no need to adjust the interface IDs for this lab!
Lab Answers Below: Spoiler Alert
Lab Answers: Configuration (Click Tab to Reveal)
Answers
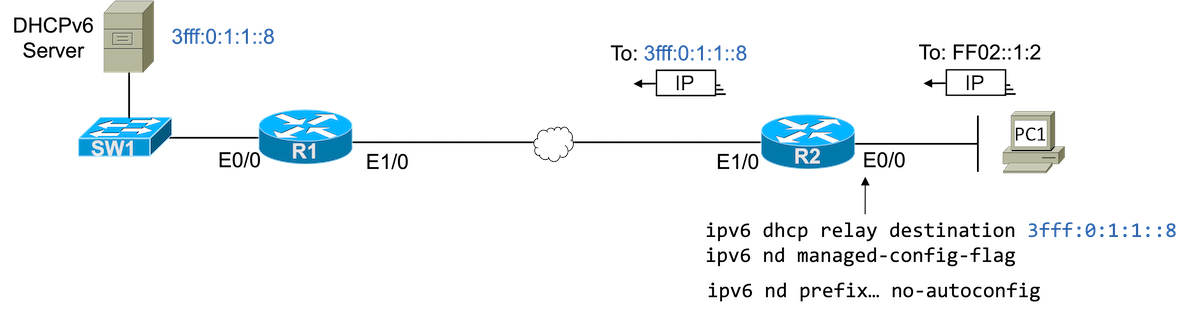
Figure 2: Topology and Config
interface Ethernet0/0
  ipv6 dhcp relay destination 3fff:0:1:1::8
  ipv6 nd managed-config-flag
  ! Optional Config Below
  ipv6 nd prefix 3fff:0:1:2::/64 no-autoconfig
Example 5: R2 Config
Commentary, Issues, and Verification Tips (Click Tabs to Reveal)
Commentary
Focusing on the configuration, first consider the DHCPv6 Relay Agent. The client, PC1, sits in one subnet, and the DHCPv6 server in another. So a DHCPv6 relay agent is needed. The function and config command need to be enabled on the router connected to the same subnet as the client devices, which in this case is router R2’s E0/0 interface.
Next, consider the address assignment flags M, O, and A. M (Managed) and O (Other) both relate to the use of DHCPv6, and both are disabled by default. To support stateful DHCPv6 – that is, the use of DHCPv6 to lease the addresses to clients – the router connected to the client subnet needs to enable the M flag.
Additionally, that same router can use any settings for the other two flags. However, if you leave the A flag set, the clients believe they can use SLAAC to create their IPv6 addresses. The A flag is enabled by default – so you might have chosen to disable that flag as well. (I attempted to leave that option open to you per the lab instructions.)
Based on this analysis, the configuration should be relatively straightforward. You configure R2’s E0/0 interface with:
- ipv6 dhcp relay destination 3fff:0:1:1::8
- ipv6 nd managed-config-flag
- (optionally) ipv6 nd prefix 3fff:0:1:2::/64 no-autoconfig
Finally, a reminder that each time you change the configuration, you need to trigger a new attempt to lease an address from the PC by disabling and enabling the PC’s interface using shut/no shut.
The lab instructions tell you to follow this process:
- Verify the initial state.
- Configure the lab.
- Trigger the PC’s DHCPv6 client process (shut/no shut).
- Verify the final state using the same commands as in step 1.
Refer to the details in the lab instructions above about the specific commands. That said:
DHCPv6 Server
The CCNA exam blueprint does not require you to know or understand DHCPv6 server configuration. However, the suggested verification commands can show you some clear evidence of progress, especially if you remember the output from the initial state versus the output after you configure the lab correctly. Specifically:
- The “bindings” command will list no output before DHCPv6 works, and will list details about the PC’s DHCPv6 lease after it works.
- The “pool” command lists the configured pool info before the PC’s lease works, plus a statistic showing 0 addresses leased. After the PC leases an address, look for that stat to show 1 address leased.
R2 as DHCP Relay Agent and IPv6 Address Flags
You will configure the commands on R2, on its interface connected to the PC’s subnet, which is R2’s E0/0 interface. Here, try these steps:
- Examine the config to determine the commands that appear under R2’s E0/0 interface.
- Use the show ipv6 interface e0/0 command and look at the bottom. After configuring correctly, this command should end with a line stating that clients will use DHCP to obtain their addresses.
PC (Router) as a Stateful DHCPv6 Client
This part of the lab asks you to stretch a bit. Again, it delves into topics that I think are outside the CCNA 200-301 V1.1 blueprint. That said, you can still learn a lot by exploring and comparing the before-and-after comparisons.
Think of the six recommended commands as three sets of two. The first two sets confirm the address and default route:
- Use show ipv6 interface brief to confirm the PC has leased a GUA. It should begin with 3fff:0:1:2.
- Use show ipv6 route to confirm the PC has added a default route to destination ::/0. This should happen based on information learned from R2 via the NDP Router Advertisement (RA) message. That fact should be seen in the routing code for the route.
The first ping tests IPv6 connectivity, and the second adds a test of DNS resolution:
- Use ping 3fff:0:1:1::8 to confirm the PC has a routable (GUA) address, and that routing works from the PC to the server on the left.
- Use ping www.example.com to confirm the PC also knows of the DNS server address and that DNS resolution worked. (www.example.com resolves to address 3fff:0:1:1::8.)
Use the final two commands to directly view the other information learned using DHCPv6: The domain name and the DNS server address. (Note that in my testing, the show ip dns server was erratic, sometimes taking some time before displaying the correct information.)
Config Lab Review Video
Want to hear more about this lab’s solution? Check out the video to the left.